artificial hanging baskets, topiary balls, hedges and topiary trees
Artificial hedges & screening
Artificial hedges and screening offer a quick way to add greenery, improve privacy or cover an unattractive fence or wall. Choose from realistic artificial hedge panels and foliage screening that stay green throughout the year without trimming, watering or waiting for plants to grow.
An artificial hedge is the quickest way to turn a tired fence, a bare wall or an overlooked patio into a wall of green. Panels clip together, cut with scissors and fix with cable ties, and the result looks the same in January as it does in July. But not all hedging is equal: some panels stay dense and green for eight years, others fade to grey and sag off the fence in two. This guide covers the formats and foliage types, the numbers that tell you a quality panel from a cheap one, how to measure and fix it, the rules on height, neighbours and fire safety, and how to make the finished result look like a hedge rather than a plastic wall.
1. What artificial hedging is for
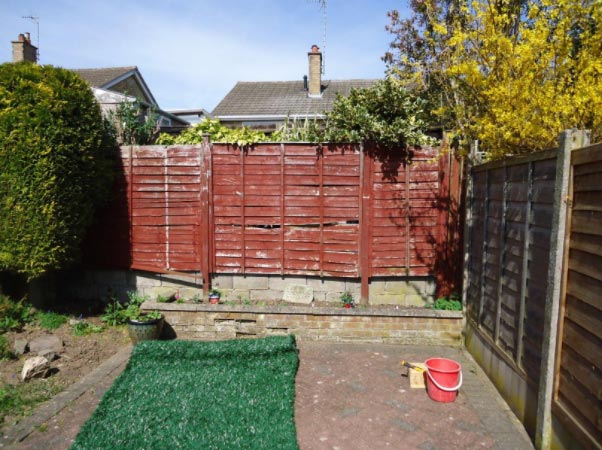
Above: before artificial hedging is installed
Above: After artificial hedging is installed
Artificial hedging does four jobs well. It hides things: a crumbling wall, a rotten or mismatched fence, the side of a garage, the bins, a neighbour's shed. It screens: a balcony, a hot tub, a seating area, a boundary that's overlooked. It fills gaps where nothing will grow, like the shaded strip under a tree or the north side of a wall where a real hedge has gone bare at the base. And it creates features: a green backdrop to a patio, a hedge along the edge of decking, a low divider between the dining and lounging ends of a garden.
Once it's up there's nothing to do. No trimming, no feeding, no watering through a dry spell, no brown patches after a hard winter and no waiting three years for it to fill out. That's the whole appeal.
2. Real vs artificial: cost, time and effort
A real hedge is a wonderful thing if you have the time and the patience. Here's an honest comparison for a typical 1.8m-high boundary run.
Real hedge
Artificial hedge
Cost per metre
£12–£55 for plants and mulch (bare-root privet to container laurel); £60–£90 for instant hedge units; £20–£60/m if a landscaper plants it
£25–£60 per square metre for good panels; roughly £45–£110 per metre at 1.8m high
Time to full screen
2–5 years from young plants; leylandii faster, yew slower
The afternoon you fit it
Trimming
1–3 times a year; leylandii and privet need the most. Not between March and August if birds may be nesting
None
Watering and feeding
Weekly in the first two summers; annual feed
None
Grows where nothing else will
No: shade, dry soil and root competition all limit it
Yes
Wildlife value
High: nesting, shelter, food
None
Expected life
Decades if it thrives
5–8 years for quality panels; 3–4 for budget ones
Real hedges win on longevity and wildlife. Artificial wins on speed, on effort, and in the places a real hedge simply won't grow. Many people use both: a real hedge on the sunny boundary and artificial panels on the shaded, difficult wall.
3. Formats: tiles, panels, rolls, trellis and freestanding hedges
Artificial hedging comes in five main formats, and picking the right one for the job matters more than the foliage style.
50×50cm tiles. The most common format. Each tile has a flexible plastic mesh backing with clips along the edges so they connect into a continuous surface, and the mesh cuts with scissors. Four cover a square metre. Easy to post, easy to handle, and ideal for working round posts, corners and odd shapes. Sold in packs of 6 or 12.
1×1m panels. The same construction, four times the size. Fewer joins and faster to fit on long runs, but bulkier to handle. You can mix the two: large panels for the open stretches, tiles for the edges.
Rolls (typically 3×1m). Foliage on a flexible mesh you unroll along a fence. Usually cheaper per square metre and quick to fit, but the foliage tends to be thinner than tiles and the mesh is less rigid, so they can sag on long runs without fixings every 30cm or so. Good for long low runs and for softening railings.
Expanding willow trellis with leaves. A natural willow trellis with artificial leaves woven onto it, sold as 2×1m but stretching to 2.75×0.6m or anything in between. Very quick, very light and very cheap per square metre. Be honest with yourself about what it is: the coverage is partial (you can see through it to some extent, and the more you stretch it, the more you see), the leaves sit only on the front, and the willow itself weathers and greys over the years. Excellent for dressing a wall or softening a fence; not a privacy screen on its own unless you back it with shade netting.
Freestanding hedges in troughs. A panel hedge pre-built onto a frame in a planter, typically 1m long and 25–35cm deep, in heights from 50cm to 2m. Nothing attaches to the building, so they're the answer for balconies, rented homes and anywhere you want to move the screen around. They weigh 3–10kg and need ballast (sand, gravel or a paving slab in the trough) in any exposed position.
4. Foliage types: boxwood, laurel, ivy, conifer, fern and mixed
Look carefully at the close-up photos before you order. From three metres away most artificial hedging looks convincing; the differences show up at a metre.
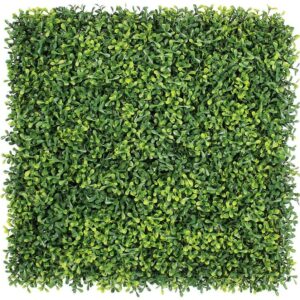
Boxwood (box). Small, dense, dark green leaves that mimic a clipped box hedge. The most realistic, the most popular and, done well, the densest. The right choice anywhere people will get within a metre of it, and for formal or modern gardens.
Laurel and large-leaf. Bigger, glossier leaves that read as a natural evergreen shrub rather than a clipped hedge. Good for softening walls and for the expandable trellis format. Looks best mixed with some real planting in front.
Ivy. Trailing, cottage-garden feel. Suits brick walls, courtyards and railings; less convincing as a clipped boundary hedge.
Conifer or fir. Needle-like foliage. It's cheaper than boxwood and covers large areas well, but up close it can look like an artificial Christmas tree. Best for big backdrops, behind existing planting, or anywhere nobody will inspect it.
Fern. Feathery fronds with a softer, woodland look. Lovely under trees and in shade, where it also happens to be the one place a real fern would actually grow, which helps it convince.
Mixed foliage. Panels combining grass, fern, moss, ivy and flowers. These read as a "living wall" rather than a hedge. Great as a feature panel behind a seat or a bar; too busy for a whole boundary.
If you're covering a whole boundary, use one foliage type throughout. Mixing styles on a small garden makes it look like a sample board.
5. How to tell a good panel from a cheap one
The photos all look similar. The specification is where the difference shows, and a good listing will give you numbers rather than adjectives. Look for:
Shading percentage. How much of the backing the foliage covers. Quality boxwood tiles state 95–98%. If no figure is given, assume less.
Strands or stems per tile. Around 400 strands per 50×50cm tile is a dense panel. Budget tiles may have half that and show mesh between the leaves.
Leaf layers. Good tiles use multi-layer leaves (four layers on the best boxwood) so the foliage has depth and casts shadow on itself. Single-layer leaves look flat.
Depth. Around 5cm of foliage in front of the mesh is a proper hedge; 2cm is a green mat.
Colour variation. Real hedges have two or three tones of green and the odd lighter tip. A panel in one flat shade is the biggest giveaway of all.
The backing. Rigid enough to hold flat, flexible enough to bend round a corner, with proper male-and-female clips on all four edges so tiles connect without gaps. Cheap backing is brittle and snaps when you cut it.
Material and UV treatment. Panels are made from PE (polyethylene), PVC or PU. All three can be good. What matters is the phrase "UV-stabilised", meaning the inhibitors are mixed into the plastic and can't wear off, rather than "UV-coated" or "UV-resistant" alone, which may mean a surface spray that lasts a season. A listing that names the material and says UV-stabilised is telling you it was made for the outdoors.
A stated lifespan. Good manufacturers will commit to a figure, typically 5–8 years outdoors. If a listing won't say, that's an answer too.
Our bestselling boxwood tiles, for reference, are 98% shaded, 400 strands per tile, four-layer leaves, 5cm deep and UV-stabilised, with a stated outdoor life of five to eight years. Use those figures as your benchmark whatever you buy.
6. Privacy: how much can you see through?
Two things surprise people. First, hedge panels are single-sided: the foliage faces one way and the back is bare mesh. Second, even a 98%-shaded panel lets light through the mesh, so against the sky or a bright background you'll see a glow of daylight through it, and from the neighbour's side they'll see the mesh.
If the panels are going onto an existing solid fence or wall, none of this matters. If you're building a freestanding screen, topping a fence, or dressing a railing or glass balustrade, decide how private it needs to be:
For a visual softening, a single layer is fine.
For genuine privacy, fix a layer of dark shade netting (80% or 98%) or a solid board behind the panels, or use a two-sided freestanding hedge.
For a screen seen from both sides, fix panels back to back on a frame, or accept that one side shows mesh and face the foliage towards whoever matters most.
7. Measuring up and how many to order
How many artificial hedge panels do I need?
Enter the size of the area you want to cover and the size of one hedge panel. We’ll work out how many complete panels you need.
You’ll need
0 panels
0 across × 0 high
This allows for complete panels across the full width and height. If the edges are awkward or you expect to make several cuts, consider ordering a spare panel.
Measure the width and height of the area in metres. Then, rather than simply dividing the area by the tile size, work out how many tiles fit across (rounding up) and how many fit up (rounding up) and multiply. Offcuts from one edge rarely fit another, so a part-tile counts as a whole one. A 2m-wide by 1.8m-high fence, for example, is 3.6m² on paper but needs 4 tiles across and 4 up, so 16 tiles, not 15. Our simple calculator above will help you do the maths.
Order everything you need in one go, plus one or two spares. Colour can vary slightly between manufacturing batches, and a mismatched tile in the middle of a run shows. Spares also let you repair a damaged tile years later. A 12-pack of 50cm tiles covers 3m²; a 6-pack covers 1.5m².
If you're covering a whole fence, decide now whether the panels go over the posts too (cleaner, uses more tiles) or stop at each post (cheaper, and a visible post every 1.8m can actually help the illusion by breaking up the run).
8. Fixing to fences, walls, railings and frames
Panels are light (a 50cm tile weighs a few hundred grams) but a whole fence of them adds up, and they catch wind. Before you start, check the fence, posts or wall are sound; whatever you fix to carries the load. Then join tiles into larger sections on the ground first, check the foliage all "lies" the same way (most panels have a natural direction), and fix as follows:
Timber fence. Galvanised U-nails or heavy-duty staples through the mesh backing into the timber, every 25–30cm around the edges and a few through the middle. Fast and very secure. Cable ties through gaps between boards also work on featheredge.
Wire mesh, chain-link, railings and trellis. UV-rated black cable ties straight through the mesh, every 20–30cm. The quickest method of all. Packs usually include some ties; buy more, because you'll want them.
Brick, block or rendered wall. You can't fix panels directly to masonry. Screw treated timber battens horizontally to the wall with plugs, every 40–60cm, stretch galvanised mesh across the battens and staple it, then cable-tie the panels to the mesh. The battens also hold the panels off the wall so air circulates behind them.
Freestanding screen or decking edge. Build a simple frame from treated timber or post-and-rail, set the posts in the ground or bolt to the decking, fill with galvanised mesh, then fix panels to the mesh. For a hedge along decking, a low frame 60–90cm high with a planter-style board along the base looks best.
Balcony rail or glass balustrade. Cable-tie to a metal rail; for glass or where you can't tie, clamp a slim batten frame to the balustrade and fix to that. Never rely on adhesive fixings at height.
Work from one corner, keep the top edge level with a string line, and fix each panel before clipping the next. Trim to fit round posts and corners with strong scissors or secateurs.
9. Wind and exposed sites
A well-fixed panel doesn't act as a sail because it can't flex away from the surface. Failures happen when a corner lifts, wind gets behind it and the load multiplies from there. So on anything exposed, including the top strip of a fence, a rooftop or a coastal garden:
Fix every corner first, then the top edge at every mesh intersection, roughly every 25cm.
Use more fixing points, not stronger ones: eight to ten per tile rather than four.
Prefer tiles over rolls on exposed runs; the rigid backing holds flat.
On high balconies and roof terraces, consider open-weave ivy or trellis formats that let air through, or a freestanding hedge you can move under cover in a storm.
Walk the garden on a windy day. Corners of fences and gaps between buildings funnel gusts; give those spots extra fixings.
Check all fixings after the first storm and again each spring.
Freestanding hedges in troughs need ballast in any breeze: a paving slab, a bag of sand or gravel in the base. On a balcony, place them against the balustrade rather than mid-floor, and bring them in when gales are forecast.
10. Making it look like a hedge, not a wall
A real hedge grows out of the ground and has a top, a bottom and a slightly uneven face. A panel is a flat green rectangle. Closing that gap is mostly about the edges.
Give it something to grow from. Hedging that appears to sprout straight out of paving or decking is the most common giveaway. Run a planter, a raised bed, a gravel board painted dark, or a strip of real low planting along the base so the "hedge" has roots to come from.
Finish the top. Stop the panels 5–10cm below the top of a fence and the fence reads as a support behind a hedge; run them over the top and the illusion depends entirely on the panel quality. Alternatively cut the top edge slightly uneven, or fix a strip of offcuts along the top at a slight forward angle to give it a clipped-hedge profile.
Use the offcuts. Cable-tie spare pieces over the top of thin patches and over the joins, slightly proud of the surface, to add depth and break up the grid.
Break the flatness. A real hedge has things in front of it. A pot, a bench, a climber on a wire, a fern in a shaded corner: anything that casts a shadow on the panel makes it look deeper.
Mix in real plants. A few real evergreens in front (pittosporum, euonymus, hebe) tie the artificial panel into the garden and give you the movement and scent that plastic can't.
Turn corners properly. Bend the mesh round an external corner rather than butting two cut edges together, and overlap foliage on internal corners to hide the join.
11. Heights, neighbours, leases and planning
Artificial hedging is generally treated as a minor, reversible alteration, but three rules catch people out.
Height counts. For planning purposes, anything fixed to a fence counts towards its total height. In England the permitted limit without planning permission is 2m from ground level, or 1m where the fence is next to a road or its footpath. A 1.8m fence with 30cm of hedging above it is a 2.1m structure and needs permission. Rules differ in Scotland, Wales and Northern Ireland, and listed buildings and conservation areas have their own restrictions.
Whose fence is it? You cannot fix anything to a neighbour's fence without their consent, even on your side; doing so can count as trespass or criminal damage. Ownership is shown by T-marks on the deeds or title plan, not by which side the posts are on. If it's theirs, ask in writing; if they say no, a freestanding frame just inside your boundary gives you the same result.
Leases and tenancies. Many flat leases allow planters and screens but forbid fixings into the building or the balustrade, and some restrict anything visible from outside. Check, and ask your managing agent or landlord in writing. Clamp-on frames and freestanding hedges keep you on the right side of most leases.
Real hedges, incidentally, aren't subject to planning height limits at all, but evergreen hedges over 2m can be the subject of a complaint under the High Hedges legislation. That doesn't apply to artificial hedging, which is treated as part of the fence.
12. Fire safety: what you need to know
Artificial foliage is plastic, and plastic burns. For a panel on a garden fence this is no more of an issue than the fence itself, but there are situations where it matters and it's better to know.
Ordinary gardens. No regulation applies. Just treat hedging like any other combustible garden material: keep barbecues, fire pits, chimineas and patio heaters well away from it, and don't fix it above or beside a barbecue area.
Balconies of flats. Fire services and insurers actively discourage decorative plastic foliage and artificial grass on balconies, because a dropped cigarette from above is the commonest cause of balcony fires and plastic screening adds fuel. For residential buildings with a floor 11m or more above ground (roughly four storeys), the Building Regulations restrict combustible materials on balconies and external walls, and your building's fire risk assessment or lease may prohibit them outright. Check with your managing agent before buying, and if you go ahead, use a freestanding hedge you can remove rather than fixed panels.
Commercial, rented and shared premises. Pubs, restaurants, hotels, offices and any enclosed public space may need hedging with a tested reaction-to-fire classification under EN 13501-1 (typically Class B). Two things to know: the classification must be for the specific product with test documentation, not a vague "fire-retardant" claim; and it was almost certainly tested on a non-combustible backing such as cement board or masonry. Fix the same panel to a timber fence and the classification no longer applies. If a landlord, insurer, architect or fire officer has specified a fire class, ask the supplier for the certificate and the tested fixing method.
13. A word about wildlife
A real hedge feeds and shelters birds, hedgehogs, insects and a great deal else, and no artificial panel does any of that. If you're replacing a living hedge with panels, you're removing habitat. We'd suggest keeping some real planting somewhere in the garden, even a couple of shrubs or a climber in front of the panels, and if you're taking out a real hedge, doing it outside the March-to-August nesting season. Artificial hedging is at its best covering things that were never alive: walls, fences, garages and the patches of ground where nothing would grow anyway.
14. Cleaning, care and storms
Hedging collects dust, pollen, cobwebs and, near roads, a grey film. Once or twice a year, brush off loose debris with a soft brush, rinse with a gentle hose from the top down, and wipe stubborn grime with a damp cloth and a drop of washing-up liquid. Avoid pressure washers, which can strip leaves off the strands, and avoid hot water and solvents. In winter, avoid bending or cutting panels in freezing weather when the plastic is brittle.
After a storm, walk the run and check for lifted corners, snapped ties or panels that have pulled away from the mesh. Re-fix promptly; a loose panel is the one that gets shredded in the next gale. Freestanding hedges are best moved under cover when a named storm is forecast.
Hedge panels are the standard way to screen a beer garden, divide a terrace, dress a shopfront or hide a bin store, and freestanding hedges in troughs are the cheapest movable divider you can buy for a café or event space. For commercial premises, three extras:
Fire classification. Ask your insurer and check your fire risk assessment before buying (see section 12). If a class is required, buy certified panels and fix them the tested way.
Fixing and inspection. Use more fixings than you think you need, set a twice-yearly inspection, and fix freestanding units to the ground with ground anchors or pipe brackets in any public space.
Pavements and highways. Screens on or over a public pavement usually need council consent, and anything projecting over a footway must leave clear headroom. Freestanding hedges on your own forecourt usually don't.
16. How long will it last?
Quality UV-stabilised panels on a fence in UK conditions should look good for five to eight years, and often longer on a shaded or north-facing wall. Budget panels and expandable trellis typically hold their colour for three to four years before greening pales; the willow on trellis products weathers to silver-grey sooner than the leaves fade. South- and west-facing positions are the harshest. An annual UV-protection spray extends colour life, and keeping a few spare tiles from the original batch means a tired or damaged section can be swapped rather than the whole run replaced.
17. Buyer's checklist
Before you click "buy":
Have you measured across and up, rounded each up to whole tiles, and added spares from the same batch?
Does the listing give a shading percentage (95%+), strands per tile (300+), leaf layers and depth?
Is the material named and described as UV-stabilised, with a stated outdoor lifespan?
Have you seen a close-up photo of the actual foliage, not a garden-wide shot?
Right format for the job: tiles or panels for fences and walls, freestanding hedges for balconies and rentals, trellis for softening rather than screening?
Do you need it to be private? If so, what goes behind the panels?
What are you fixing to, and do you have U-nails, UV-rated cable ties, battens and mesh as needed?
Is the fence yours? Will the total height stay under 2m (or 1m by a road)?
If it's a flat, does the lease allow it and is the balcony below 11m?
If it's a business, has anyone specified a fire class?
What will the base look like: planter, raised bed, gravel board or real planting?
Is there a barbecue or fire pit anywhere near it?
We hope this helps you choose and fit the right hedging for your space. If you have a question we haven't covered, get in touch and we'll be glad to help.
FAQs
How many artificial hedge tiles do I need?
Measure the width and height in metres, work out how many 50cm tiles fit across (rounding up) and how many fit up (rounding up), then multiply. A 2m by 1.8m fence needs 4 across and 4 up, so 16 tiles. Offcuts rarely reuse, so always round up, and order a couple of spares from the same batch.
How do I fix artificial hedge panels to a brick wall?
You can't fix them directly to masonry. Screw treated timber battens horizontally to the wall every 40–60cm, stretch galvanised mesh across the battens and staple it, then cable-tie the panels to the mesh. The battens also hold the panels slightly off the wall so air can circulate behind.
How do I fix artificial hedge panels to a fence?
On a timber fence use galvanised U-nails or heavy-duty staples through the mesh backing every 25 - 30cm around the edges, plus a few through the middle. On wire mesh, chain-link or railings, use UV-rated black cable ties every 20 - 30cm. Clip tiles together on the ground first, keep the foliage direction consistent, and fix corners first.
Can you see through artificial hedge panels?
Partly. Panels are single-sided with bare mesh on the back, and even a 98%-shaded tile shows daylight through it against a bright background. On a solid fence or wall that doesn't matter. For a freestanding screen, fence topper or balcony rail, fix shade netting or a board behind the panels, or use a two-sided freestanding hedge.
Do artificial hedges blow down in the wind?
Not if they're fixed properly. Failures start when a corner lifts and wind gets behind the panel, so fix every corner first, then the top edge every 25cm, using eight to ten fixings per tile on exposed sites. Tiles hold flat better than rolls in wind. Check fixings after storms and each spring.
Do I need planning permission for an artificial hedge on top of my fence?
Anything fixed to a fence counts towards its height. In England the limit without planning permission is 2m from ground level, or 1m next to a road or its footpath. A 1.8m fence with 30cm of hedging on top is 2.1m and needs permission. Rules differ elsewhere in the UK and in conservation areas.
Can I put artificial hedging on my neighbour's fence?
Not without their consent, even on your side of it. Fixing to someone else's fence can count as trespass or criminal damage. Check the deeds for T-marks to confirm ownership, ask in writing, and if they refuse, build a freestanding frame just inside your own boundary.
Are artificial hedges a fire risk?
They're plastic, so they burn. On a garden fence that's no different from the fence itself; just keep barbecues, fire pits and heaters away. On flat balconies, fire services and insurers discourage plastic foliage, and buildings over 11m have legal restrictions. Commercial and shared premises may need panels with an EN 13501-1 fire classification, fixed to a non-combustible backing.
How long do artificial hedges last outside?
Quality UV-stabilised panels last five to eight years on a UK fence, longer on a shaded wall. Budget panels and expandable willow trellis typically hold colour for three to four years. South- and west-facing positions fade fastest. An annual UV spray and a few spare tiles from the original batch extend the life of the run.
Which artificial hedge looks most realistic?
Boxwood, provided the panel is dense: look for 95–98% shading, around 400 strands per 50cm tile, multi-layer leaves, 5cm depth and two or three tones of green. Conifer and fir are cheaper but can look like a Christmas tree up close, so save them for large backdrops. Whatever you choose, give the hedge a planter or bed to "grow" from.
We use cookies on our website to give you the most relevant experience by remembering your preferences and repeat visits. By clicking “Accept All”, you consent to the use of ALL the cookies. However, you may visit "Cookie Settings" to provide a controlled consent. View privacy & cookies policy.
This website uses cookies to improve your experience while you navigate through the website. Out of these, the cookies that are categorized as necessary are stored on your browser as they are essential for the working of basic functionalities of the website. We also use third-party cookies that help us analyze and understand how you use this website. These cookies will be stored in your browser only with your consent. You also have the option to opt-out of these cookies. But opting out of some of these cookies may affect your browsing experience.
Necessary cookies are absolutely essential for the website to function properly. These cookies ensure basic functionalities and security features of the website, anonymously.
Cookie
Duration
Description
cookielawinfo-checkbox-advertisement
1 year
The cookie is set by GDPR cookie consent to record the user consent for the cookies in the category "Advertisement".
cookielawinfo-checkbox-analytics
11 months
This cookie is set by GDPR Cookie Consent plugin. The cookie is used to store the user consent for the cookies in the category "Analytics".
cookielawinfo-checkbox-functional
11 months
The cookie is set by GDPR cookie consent to record the user consent for the cookies in the category "Functional".
cookielawinfo-checkbox-necessary
11 months
This cookie is set by GDPR Cookie Consent plugin. The cookies is used to store the user consent for the cookies in the category "Necessary".
cookielawinfo-checkbox-others
11 months
This cookie is set by GDPR Cookie Consent plugin. The cookie is used to store the user consent for the cookies in the category "Other.
cookielawinfo-checkbox-performance
11 months
This cookie is set by GDPR Cookie Consent plugin. The cookie is used to store the user consent for the cookies in the category "Performance".
viewed_cookie_policy
11 months
The cookie is set by the GDPR Cookie Consent plugin and is used to store whether or not user has consented to the use of cookies. It does not store any personal data.
Functional cookies help to perform certain functionalities like sharing the content of the website on social media platforms, collect feedbacks, and other third-party features.
Cookie
Duration
Description
na_id
1 year 1 month
This cookie is set by Addthis.com to enable sharing of links on social media platforms like Facebook and Twitter
na_rn
1 month
This cookie is used to recognize the visitor upon re-entry. This cookie allows to collect information on user behaviour and allows sharing function provided by Addthis.com
na_sc_e
1 month
This cookie is used to recognize the visitor upon re-entry. This cookie allows to collect information on user behaviour and allows sharing function provided by Addthis.com
na_sr
1 month
This cookie is set by Addthis.com. This cookie is used for sharing of links on social media platforms.
na_srp
1 minute
This cookie is used to recognize the visitor upon re-entry. This cookie allows to collect information on user behaviour and allows sharing function provided by Addthis.com
na_tc
1 year 1 month
This cookie is set by the provider Addthis. This cookie is used for social media sharing tracking service.
ouid
1 year 1 month
The cookie is set by Addthis which enables the content of the website to be shared across different networking and social sharing websites.
Performance cookies are used to understand and analyze the key performance indexes of the website which helps in delivering a better user experience for the visitors.
Cookie
Duration
Description
_gat
1 minute
This cookies is installed by Google Universal Analytics to throttle the request rate to limit the colllection of data on high traffic sites.
d
3 months
This cookie tracks anonymous information on how visitors use the website.
YSC
session
This cookies is set by Youtube and is used to track the views of embedded videos.
Analytical cookies are used to understand how visitors interact with the website. These cookies help provide information on metrics the number of visitors, bounce rate, traffic source, etc.
Cookie
Duration
Description
__gads
1 year 24 days
This cookie is set by Google and stored under the name dounleclick.com. This cookie is used to track how many times users see a particular advert which helps in measuring the success of the campaign and calculate the revenue generated by the campaign. These cookies can only be read from the domain that it is set on so it will not track any data while browsing through another sites.
_ga
2 years
This cookie is installed by Google Analytics. The cookie is used to calculate visitor, session, campaign data and keep track of site usage for the site's analytics report. The cookies store information anonymously and assign a randomly generated number to identify unique visitors.
_gid
1 day
This cookie is installed by Google Analytics. The cookie is used to store information of how visitors use a website and helps in creating an analytics report of how the website is doing. The data collected including the number visitors, the source where they have come from, and the pages visted in an anonymous form.
Advertisement cookies are used to provide visitors with relevant ads and marketing campaigns. These cookies track visitors across websites and collect information to provide customized ads.
Cookie
Duration
Description
DSID
1 hour
This cookie is setup by doubleclick.net. This cookie is used by Google to make advertising more engaging to users and are stored under doubleclick.net. It contains an encrypted unique ID.
IDE
1 year 24 days
Used by Google DoubleClick and stores information about how the user uses the website and any other advertisement before visiting the website. This is used to present users with ads that are relevant to them according to the user profile.
test_cookie
15 minutes
This cookie is set by doubleclick.net. The purpose of the cookie is to determine if the user's browser supports cookies.
uid
1 year 1 month
This cookie is used to measure the number and behavior of the visitors to the website anonymously. The data includes the number of visits, average duration of the visit on the website, pages visited, etc. for the purpose of better understanding user preferences for targeted advertisments.
uuid
3 months
To optimize ad relevance by collecting visitor data from multiple websites such as what pages have been loaded.
VISITOR_INFO1_LIVE
5 months 27 days
This cookie is set by Youtube. Used to track the information of the embedded YouTube videos on a website.



 A warm welcome from The Artificial Flowers Company. We offer artificial flower arrangements, silk flowers, hanging baskets, topiary balls, topiary plants and much more - we hope you find what you're looking for!